
Recipes are simply guidelines to good food.
Please feel free to make any of these recipes your own! I rarely follow a recipe completely but they certainly help to get the ball rolling. There is a comment section at the bottom of this page and I would love to hear from you!
Thank you and enjoy spending time with your kids, significant others, or alone while making some yummy easy meals.
Thank you and enjoy spending time with your kids, significant others, or alone while making some yummy easy meals.
Quinoa Turkey Chili
I'm so upset I never took any photos of my chili I made because it turned out way yummier than I thought it would! The temperature started to drop last week so I started to make a white chili I'd found on Pinterest and it ended up being a regular tomato-based chili but it tasted great.
Chili is one of my favorite meals during the fall and winter seasons and if it's one of yours, too, then I highly suggest trying this recipe out! Disclaimer: I don't use measurements when I'm throwing things together so just eyeball it :) And of course, remember to taste before servings. This recipe makes a TON of chili. Like, leftovers for DAYS. It freezes well, though, so feel free to make this amount and save some for an easy meal down the road.
Chili is one of my favorite meals during the fall and winter seasons and if it's one of yours, too, then I highly suggest trying this recipe out! Disclaimer: I don't use measurements when I'm throwing things together so just eyeball it :) And of course, remember to taste before servings. This recipe makes a TON of chili. Like, leftovers for DAYS. It freezes well, though, so feel free to make this amount and save some for an easy meal down the road.
|
Ingredients
2 - 30oz cans of tomato sauce 3 cans of diced tomatoes 4 cans of beans (Any is fine. I used 2 black beans, 1 northern bean, and 1 kidney bean) 3 cups of cooked quinoa or ancient blend mix 2.5lbs ground turkey 1 small to medium sized onion, diced 3 cloves of garlic, minced Cumin Chile powder Garlic powder Parsley Oregano Salt Pepper ...and hopefully I'm not forgetting anything else... |
Directions
1. Brown the turkey over medium-high heat. When it's halfway browned, add the onion and minced garlic. 2. In a large pot, combine the tomato sauce, tomatoes, beans, spices, and finished ground turkey. Bring to a boil. 3. While waiting for your chili to come to a boil, cook your quinoa or ancient blend according to the package directions. This step can certainly be done ahead of time if you would like! 4. When your quinoa is cooked, add it to the chili pot. Stir everything together. Let it come to a boil again before turning the heat down to a simmer. 5. Make sure to taste test to adjust the seasonings! |
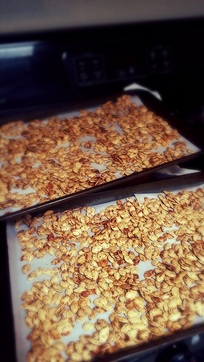
Spicy Pumpkin Seeds
Ah, fall. White girl season. Pumpkin everything is everywhere these days and while I am not really a fan of pumpkin spice, some pumpkin recipes are unavoidable. Roasted pumpkin seeds are one of those things! I mean honestly, you purchased those pumpkins for carving so why not just take a bit of extra time to clean the seeds, dry them, and roast them? They make wonderful crunchy snacks in between meals or even with your meals.
This year, I didn't bother with following a recipe and decided to just throw some seasonings in a bag and have at it. Pumpkin seeds can be flavored however you like (sweet, spicy, salty, plain) but this is one is a Spicy version.
It is important to note that these seeds need to be dried before you roast them. You can do this by popping them in the oven for an hour at 325*F or leaving them out to dry for 24-48 hours.
|
Ingredients
Pumpkin seeds, dried Chile powder Ground red pepper Cumin Garlic powder Onion powder Salt Pepper Olive oil Ziplock baggie (size dependent on amount of seeds) Directions 1. Preheat oven to 350*F. 2. Combine seasonings and pumpkin seeds in a Ziplock baggie. I didn't put seasoning amounts because it really varies depending on your taste and how many seeds you have. Shake bag until all the seeds are nicely covered. |
|
3. Add a tablespoon or so of olive oil to the bag and shake up again. Transfer seeds to parchment or foil lined baking sheets. Spread evenly and try to break up clumps of seeds. If you need another pan, feel free to get it out!
4. Place in oven for 10-15 minutes or until golden brown.
4. Place in oven for 10-15 minutes or until golden brown.
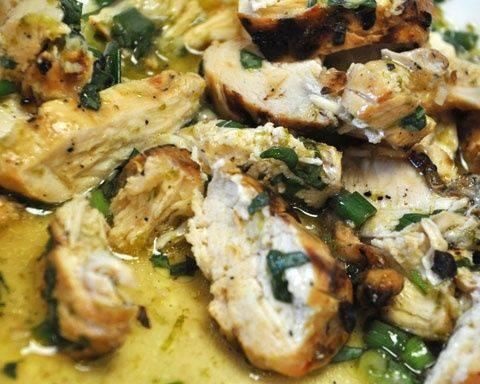
Crock Pot Balsamic Chicken
I don't know about you, but there are frequently times when I can't seem to get anything done during the day that I want to get done. Like, for example, planning dinner. Or even taking anything out for dinner. Lucky for me, this was not completely one of those times! I knew I had some boneless, skinless chicken thighs to use but I also had a time crunch in the afternoon now that my hubby and I are hitting the gym between when he gets home and when dinner needs to be ready.
Quick fix? The crock pot, of course! I found this recipe on Pinterest (surprise, surprise) and I had been wanting to try it for awhile so now I finally completed it. AND IT WAS SO GOOD!!! The chicken fell apart just trying to move it from the serving dish to our plates. And it was oh so moist. I will say, again probably, that I tend to eyeball my measurements, especially liquids so it's very likely that I used too much balsamic vinegar.
My sides included sweet corn (only frozen veggie I had at the time) and some couscous cooked in half chicken stock and half water. Then, I took the cooked couscous and put it in a skillet with some olive oil, garlic, parsley, and dried oregano and heat it all the way through. I poured the remaining juices from the crock pot into a dish to use on the couscous if anyone wanted it.
|
Ingredients
8 boneless, skinless chicken thighs 1 tsp garlic powder 1 tsp dried basil 1/2 tsp pepper 1/2 tsp salt 2 tsp dried minced onion (I just used some onion powder) 4 minced garlic cloves (I used a garlic press instead) 1 tablespoon olive oil 1/2 cup balsamic vinegar Fresh parsley, chopped (optional) Directions 1. Combine garlic powder, basil, salt, pepper, and minced onion in a small bowl. Spread on both sides of the chicken thighs. |
|
2. Pour olive oil and minced garlic cloves into the bottom of the crock pot. Place chicken on top and add balsamic vinegar.
3. Cook on High for 4 hours. When completed, add parsley for garnish.
3. Cook on High for 4 hours. When completed, add parsley for garnish.
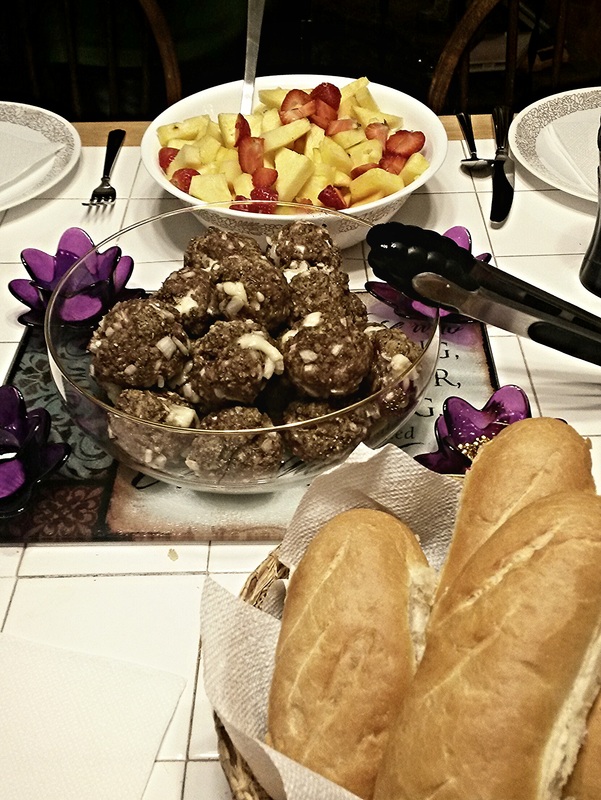
Cheese Stuffed Meatball Subs
So I had about 2-2.5lbs of ground beef that I needed to use and I couldn't for the life of me figure out what I wanted to make for dinner. And then I went to Subway. Uh, meatball subs anyone? Mmmmm....
Of course, all this led to some major Pinterest hunting for just the right meatball recipe. I probably could have figured it out on my own but considering how brain dead I felt yesterday, there was no way I was putting together ingredients without a list. And then I came upon this recipe from Brown Sugar Mama for mozzarella stuffed turkey meatballs. The picture enough was to pique (which may be an understatement) my interest. I mean, who doesn't love cheese??
I adjusted the recipe for the amount of meat I had to work with and made the meatballs a bit larger than golf ball sized so that we only needed two meatballs per hoagie roll. I didn't have any mozzarella on hand so I cut up and used some sliced Havarti cheese, which by the way, is an amazing creamy cheese if you haven't tried it. I love it! I also didn't follow the cooking directions because I didn't have that much time available to me so if YOU have the time, please feel free to try it and let me know how it goes!
|
Ingredients
1lb ground meat 1 egg, slightly beaten 1 cup bread crumbs (I used Panko) 1 cup Parmesan cheese, shredded 1 tbsp dried oregano 1 tbsp dried basil 1 medium onion, diced 2 garlic cloves, minced 2 tsp pepper 2 tsp salt 12 cubes of cheese (or however much you need) 1 jar of your favorite sauce Olive oil Your favorite hoagie rolls Extra cheese for topping the sub if wanted. Directions 1. Preheat oven to 375*F 2. Combine all ingredients EXCEPT mozzarella, sauce, and of course hoagies ;) Mix together thoroughly and do it with your hands! It's more fun and binds the ingredients together better. And it's a great excuse to have some fun time with your kids because what kid doesn't like getting their hands dirty :) |
Do you see the ooey gooey cheese???? Heaven.
|
3. Get your mozzarella ready because it's time to make some meatballs! Place a small-ish amount of meat into your hand and create a hollow area for the cheese. Make sure the cheese doesn't squish out the bottom! Then add some more meat and roll/pack it between your hands so that nothing is separated and it's all nice and smooth. You can make them any size but for 1lb of meat, golf ball sized is ideal. Place down some foil on a baking sheet and spray with a non-stick cooking spray. Evenly space out your meatballs on top and drizzle with olive oil. Place in the oven for 25 minutes for larger meatballs, about 20-23 minutes for smaller ones.
4. While your meatballs are cooking, prep your hoagie rolls. I prefer them toasted but feel free to do whatever you want with them. They soak up the marinara/spaghetti sauce really well when they aren't toasted, which I also really like. Use this time to heat up your marinara sauce as well.
5. When you hear that timer go off, take out your meatballs, put two in a hoagie, top with sauce and possibly some extra cheese (mmm cheese), and nom down!
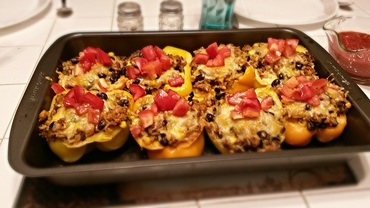
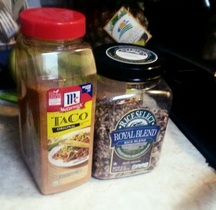
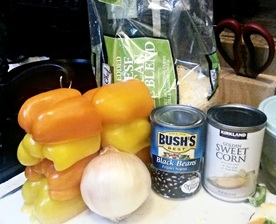
Mexican Stuffed Peppers
Stuffed stuff has to be one of my favorite ways to cook things. Why? I don't know. Probably because it's an easy way to get a variety of food without having to have a ton of sides. I also happen to love tacos but I eat an insane amount of them and I really don't need all the extra carbs and such so why not combine stuffing things with taco filling? This recipe is enough for 8 servings. Feel free to adjust according to what you need!
|
Ingredients
4 bell peppers; go for color! 1lb ground beef or turkey 1/2 medium onion 2 cups cooked wild rice 1 can black beans 1 can corn Taco seasoning (or make your own) 2 small romas (for garnish, so optional) Shredded cheese; I prefer a Mexican blend |
|
|
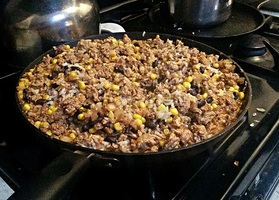
Directions
1. Preheat oven to 400*F 2. Follow the directions on your wild rice container. When you have it started, brown your ground beef or ground turkey. When the meat is halfway cooked, dice and add 1/2 a medium onion. Keep skillet on medium to medium-high heat while the meat browns. 3. While your meat and rice are cooking, cut bell peppers into halves. You can do this horizontally or vertically, whichever you prefer. Place in a baking dish that fits all your halves. 4. As your meat finishes browning up, turn down the heat and add your can of black beans and your can of corn. Mix together well and add your taco seasoning (prepare seasoning to match the overall amount of filling and follow directions on container) or whatever seasonings you are choosing to use. 5. After your rice is finished cooking and has set for 5-10 minutes, add to your taco filling and mix thoroughly. Spoon into your bell pepper halves and top with shredded cheese. Don't worry if you have leftover filling. I use it as an extra "side" with tortillas and taco fixings (sour cream, salsa, etc.). Cover with foil and place in oven for 15 minutes. After 15 minutes, remove foil and keep in oven for an additional 10 minutes. 6. While peppers are cooking the last 10 minutes, dice up your roma tomatoes if you wish to use as a garnish or use on the side. I also used this time to heat up some tortillas to use with the extra filling. If you have a gas stove, I highly suggest heating the tortillas up over the open flame and flip frequently to heat through. It should make the tortilla bubble up a bit. 7. Garnish peppers when finished if you'd like, but mostly just enjoy! |

|
Roasted Okra
Some say it can't be done. They scoff at the idea. They look down their nose, roll their eyes, and cock an eyebrow in your direction when you bring it up. But I'm here to tell you, you can. You, mother of what feels like a billion children. You, husband trying to eat healthier. You, singleton just needing to figure out how to make your little budget work for you. You can, in fact, roast okra so that isn't slimy. I was told that would never happen. That I'd have to fry it. Well, Dad, this showed you, didn't it!
It's a really basic recipe and you can feel free to season your okra however you'd like to. :)
Ingredients
OKRA! However much you want/need. It'll shrink A LOT, in case you've never cooked it before. If whole, cut up into sections. Size doesn't matter.
Salt and Pepper
Olive or Coconut oil
Garlic Salt (or finely minced garlic or garlic paste)
Directions
1. Preheat the oven to 450*F.
2. In a gallon sized bag, add garlic, oil, salt, and pepper.
3. Toss okra in bag and mix well so that each piece is evenly covered in everything.
4. Place on baking sheet, pan, or whatever you happen to have that can go in the oven.
5. Bake for 25 minutes and then enjoy!
Semi-homemade Peach(ish) Pie
I love peach pie. It's probably my favorite fruit pie that isn't a creme pie and I wish I'd made more when I lived in GA. Although, to be fair, the peaches at the grocery stores there were hardly better than here in NM. You had to go to a farmer's market for yummy peaches.
Anyway, I call this pie peach-ish because it doesn't completely deal with just peaches but it certainly tastes very peachy! I was wandering around Costco (as we all do) when I came across this big jar of apricot, peach, and blood orange preserves. Sounded incredibly tasty so I purchased some and it's basically just been sitting on my shelves waiting to be used. Then one day, I thought to myself, "Peach pie needs to be made. I am going to make some peach pie and I'm going to use preserves..."
So here you go :)
Ingredients
Frozen or pre-made pie crust (or you can make your own)*
4-5 large peaches, thinly sliced
~ 1/2 jar of E.D. Smith apricot, peach, and blood orange preserves
Cinnamon to taste
*You could also just use another pre-made pie crust as the top crust or make one yourself. Or try a crumb top!
*If you use a pre-made/frozen pie crust, I prefer the Marie Calendar's pie crusts but the Pillsbury ones are yummy, too. Choose what you like, however!
Directions
1. Preheat oven according to pie crust instructions for fruit (double crusted) pies. This may vary depending on what crust you use, but probably not by much.
2. Slice peaches thinly and add to a medium-large bowl with the preserves. Mix thoroughly.
3. Add cinnamon until it's just right for you and your family. Or just you, if you're a greedy pie eater like me. Mix everything completely. You want the filling to be mounded up above the pie crust because it'll bake down and you don't want to let it deflate too much.
4. You can place a second top on top in whatever way you wish. Or you could make a crumb top, whichever you want. Once the top is in place, put in the oven for the time suggested on the crust instructions. It will probably take about an hour to fully cook your pie but it is OH SO WORTH IT!
5. Stuff your face...after it's cooled down because otherwise you could end up a hot mess.
Stuffed Summer Squash
I received a plastic bag full of summer squash from my grandma's garden and I had no idea how else to use it so tonight I decided I'd do a variation on these awesome zucchini boats that I tried at a local restaurant. Or you could say that they are a variation of stuffed peppers but either way, you get it.
I made this to feed a family of 6 and honestly, I made WAY too much filling and really didn't have enough squash so I'm going to attempt to figure out how much I really needed for a family of 5. Summer squash comes in so many sizes so please use my ingredient list lightly and adjust it for however much you need. This post won't have any pictures because I decided to make a post about them after we'd already eaten and put stuff away so I apologize. I will be much more considerate in the future!
From start to finish, this meal took somewhere between 45 minutes to a little over an hour. I wasn't really paying attention but it comes together nicely. I also didn't put amounts of the spices used because I just add things until it tastes yummy.
I cut up some watermelon and made a side of mixed veggies to go along with this meal. I had so much extra filling that I put it in another bowl and served it on the table as well in case people wanted extra after we ran out of the stuffed squash.
Ingredients
3 - 4 yellow summer squash (the bigger the better)
1lb of hamburger or ground turkey*
2 cups of cooked grains (I used an ancient grains blend from Costco)
1 can of black beans, drained
3/4 small onion, diced
1 garlic clove (I used a garlic press)
Cumin
Ground red pepper
Oregano
Dried cilantro (but you could use fresh!)
Paprika
Turmeric
Salt and Pepper
Olive oil, optional
Stock, optional
*Remember that when you use ground turkey, it is much more dry than ground beef. While I think the olive oil is not really necessary for this recipe when using the ground beef, you will probably need it if using turkey.
Directions
1. Preheat oven to 400*F. Before starting your meat or grains, cut up your squash into decent sized chunks. If the necks seem too skinny, feel free to cut them off and just use the larger bottom part. You can use the necks in the filling or you can toss them, like I did. After you section your squash into 2-2.5" chunks, scoop out the center making sure to remove all the seeds. Place these inside of a baking dish so that they are ready when your filling is ready.
2. Place ground meat in a skillet over medium or medium-high heat and brown. When the meat is about halfway cooked, add diced onion.
3. While the meat is cooking away, get your grains cooked. Your grain of choice could be rice, couscous, quinoa, or an ancient blend like I used. You may cook your grain using water or a stock of your choice. With this meal, I made it using beef stock since the grain blend was a bit bland when I used just water. I'm sure a veggie stock would work lovely with this dish!
4. When the meat is nearly finished, add garlic and spices until it tastes yummy to you! Let simmer for a few minutes to allow all the meat to become flavored. Add in your black beans and heat through.
5. When your grains are finished cooking, add into your meat mixture. You can do this in another bowl if you don't have room in your skillet. After you mix everything together, spoon into squash "cups" and don't worry about being messy! I drizzled some olive oil over the top when I was finished to make sure nothing would dry out as it cooked. Cover your baking dish with foil and pop in the oven for 25 minutes.
